Serve Up Smiles: The Ultimate Guide to Crafting a 3D Cheeseburger Father’s Day Card SVG
Father’s Day is just around the corner, and finding the perfect gift can often feel like a daunting task. While ties and socks are classic staples, there is something undeniably special about a handmade gift that reflects personal effort and creativity. For dads who love grilling, enjoy a good burger, or simply appreciate a well-crafted joke, the Cheeseburger Father’s Day Card SVG offers a delightful solution. This project combines the joy of paper crafting with the humor of food-themed design, resulting in a keepsake that is as fun to make as it is to receive.
In this guide, we will explore everything you need to know about creating this deliciously detailed 3D card. From understanding the technical aspects of SVG files to selecting the right materials for a professional finish, we will walk you through the process step-by-step. Whether you are a seasoned crafter with a fully stocked studio or a beginner looking to try your first digital cutting project, this article will provide the insights necessary to create a memorable gift.
Why Choose a 3D Paper Burger for Dad?
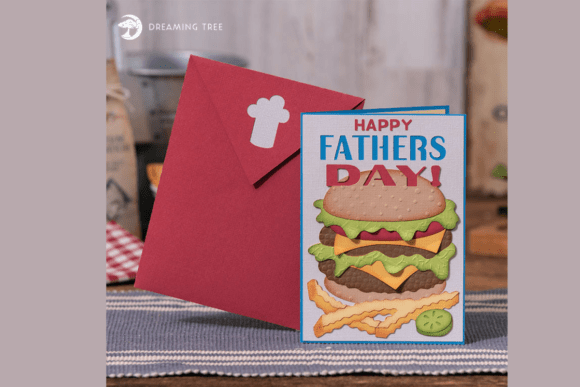
The appeal of a 3D paper craft lies in its tactile nature. Unlike a flat, store-bought card, a three-dimensional creation invites interaction. When Dad opens this card, he isn’t just reading a message; he is discovering a towering cheeseburger complete with golden crinkle fries and a cheerful greeting. This element of surprise transforms a simple greeting into an experience.
Furthermore, this design taps into universal themes of comfort and celebration. Burgers are synonymous with backyard barbecues, family gatherings, and relaxed weekends. By choosing a theme centered around grilling and favorite foods, you are acknowledging his hobbies and interests in a lighthearted way. The included envelope, embellished with a charming chef hat, adds an extra layer of thoughtfulness, signaling that every detail was considered with care.
Understanding the Digital Format: What is an SVG?
Before diving into the assembly, it is crucial to understand the file format you are working with. SVG stands for Scalable Vector Graphics. Unlike standard image files like JPEGs or PNGs, which are made of pixels, SVGs are made of mathematical paths. This means they can be resized infinitely without losing quality or becoming pixelated.
For crafters, this is a game-changer. It ensures that whether you are using a small desktop cutter or a larger commercial machine, the lines remain crisp and clean. The design you receive is compatible with all major SVG-ready cutting machines and software, including Cricut Design Space, Silhouette Studio, and ScanNCut. This versatility makes it an accessible project for users across different platforms.
Materials and Preparation
Success in paper crafting relies heavily on preparation. Having the right supplies on hand before you begin ensures a smooth workflow and a polished final product. Based on the design specifications, here is what you will need to gather:
- Cardstock Variety: You will need specific colors to replicate the realistic look of a burger. This includes Lady Bug red for tomatoes, Latte and Butter for buns, Cricket green for lettuce, Keylime for pickles, Sunflower yellow for cheese, Truffle brown for the patty, and Wave blue for decorative accents.
- Base Papers: One sheet of 12x12 White Pearlescent Paper serves as an elegant base, providing a subtle shimmer that elevates the card’s appearance.
- Tools: A cutting machine capable of handling 12x12 materials is recommended, though the project can be resized. Basic crafting tools such as tweezers, bone folders, and strong adhesive glue are essential for assembly.
- Embossing Folders: To add texture and depth, consider using embossing folders like the Cricut Bubbles or Darice patterns. These add a professional touch to the background elements.
It is important to note that while the design is optimized for 12x12 cutting mats, you can resize the project to fit your needs. However, keep in mind that resizing may slightly alter the final dimensions from the original 7-inch height by 5-inch width specification. Always perform a test cut with scrap paper if you are adjusting sizes significantly.
Step-by-Step Assembly Guide
Assembly is where the magic happens. The design comes with a handy PDF legend, which is an invaluable resource for identifying pieces and assigning colors. Follow these general steps to bring your burger to life:
- Organize Your Pieces: Before gluing anything, lay out all the cut pieces according to the PDF legend. Group them by color and layer. This prevents confusion later when you are dealing with dozens of small components.
- Construct the Base: Start with the card base and the envelope. Attach the chef hat embellishment to the envelope flap. This sets the tone for the gift and ensures the packaging is as cute as the card itself.
- Layer the Burger: Begin building the burger from the bottom up. Start with the bottom bun, then add the lettuce, patty, cheese, tomato, and pickles. Use foam adhesive squares between layers to create genuine 3D depth. This technique makes the burger "pop" off the page.
- Add the Fries: The golden crinkle fries are a separate element that can be arranged dynamically around the burger or tucked into a side pocket if the design allows. Their textured look adds realism and visual interest.
- Final Touches: Attach the "Happy Father’s Day" message prominently. Ensure all elements are secure and allow the glue to dry completely before closing the card.
For those who prefer visual guidance, a step-by-step video tutorial is included with the download. Watching the assembly process can clarify tricky folds and help you understand the order of operations better than text alone.
Tips for Customization and Creativity
While the provided color palette is designed for realism, do not feel bound by it. Creativity thrives on experimentation. If your dad loves spicy food, consider using fiery reds and oranges for the condiments. If he prefers a vegan lifestyle, you might swap the brown patty for a vibrant portobello mushroom color or a plant-based alternative hue.
You can also personalize the message inside the card. While the front features the standard greeting, the interior provides ample space for a handwritten note. Share a favorite memory of a barbecue together, or write down a funny inside joke about his cooking skills. This personal touch transforms the card from a craft project into a heartfelt letter.
The Broader Value of Handmade Gifts
In an era dominated by digital communication and mass-produced goods, handmade items hold a unique significance. They represent time, patience, and intention. When you spend hours cutting, folding, and assembling a 3D card, you are investing a part of yourself in the gift. Recipients often sense this effort, which enhances the emotional value of the present.
Moreover, engaging in crafts like this has benefits for the creator as well. It provides a break from screens, encourages mindfulness, and fosters a sense of accomplishment. For families, it can even become a shared activity. Imagine involving children in the coloring or assembly process; it becomes a collaborative tribute to Dad, making the gift even more meaningful.
Conclusion
The Cheeseburger Father’s Day Card SVG is more than just a digital file; it is an invitation to create joy. By combining precise digital design with the warmth of handmade craftsmanship, you can produce a gift that stands out in a pile of generic cards. With its detailed layers, playful theme, and customizable options, this project suits crafters of all skill levels.
Remember to take your time during assembly, utilize the provided PDF legend and video tutorial, and don’t be afraid to add your own creative flair. Whether your dad is a grill master or just someone who appreciates a good laugh, this towering paper burger is sure to serve up smiles and create lasting memories. Happy crafting, and have a wonderful Father’s Day!
For more inspiration and tutorials on paper crafting, be sure to explore our other resources on creative DIY gifts and SVG cutting tips.