Creating Coastal Magic: A Complete Guide to the Sand Pail Treat Bucket SVG
Summer is synonymous with sunshine, saltwater, and the nostalgic joy of building sandcastles. For crafters, papercraft enthusiasts, and small business owners, capturing that coastal spirit in a tangible, creative way is a delightful challenge. Enter the Sand Pail Treat Bucket SVG, a whimsical digital design that transforms flat sheets of cardstock into charming, three-dimensional party favors. This guide explores everything you need to know about this project, from its practical applications to the step-by-step assembly process, ensuring you can immerse your summer crafts in beachy fun.
Understanding the Appeal of 3D Paper Crafts
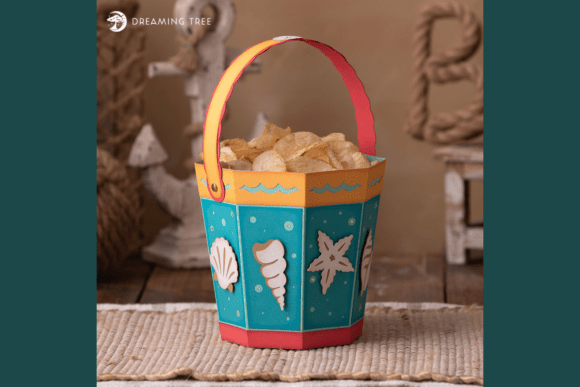
In an increasingly digital world, the tactile satisfaction of paper crafting remains a beloved hobby. The Sand Pail Treat Bucket is more than just a cut-out shape; it is a functional piece of art. Designed to look like a classic beach pail, complete with a sturdy handle and intricate coastal details, this SVG (Scalable Vector Graphics) file allows users to create professional-looking items at home.
Why choose a 3D paper bucket over traditional plastic containers? The answer lies in customization and sustainability. Paper crafts offer endless possibilities for personalization. You can match the colors to a specific party theme, add names with vinyl decals, or incorporate glitter for extra sparkle. Furthermore, paper is biodegradable and recyclable, making it an eco-friendly alternative for event favors that often end up in landfills. Whether you are planning a birthday party, a wedding reception, or a community summer festival, these buckets serve as memorable keepsakes rather than disposable trash.
What Is Included in the Digital Download?
When you purchase a digital craft file, understanding exactly what you are receiving is crucial for a smooth experience. The Sand Pail Treat Bucket SVG package is designed to be comprehensive yet straightforward. It is important to note that this is a digital download only; no physical product will be shipped to your door. Instead, you will receive a ZIP file containing the necessary SVG files compatible with most cutting machines, such as Cricut or Silhouette.
Alongside the vector files, the package includes a PDF Legend. This document serves as your roadmap, providing a clear color guide to help you select the perfect paper choices for each component of the bucket. Having a visual reference ensures that you do not mix up the pieces during the cutting and assembly phases, which is particularly helpful for beginners who may be unfamiliar with layered paper projects.
Dimensions and Scale
One of the most common questions among crafters is regarding the final size of the project. Precision is key when creating 3D objects, as ill-fitting pieces can result in a bucket that does not close properly or looks disproportionate. The Sand Pail Treat Bucket is designed with specific dimensions to ensure stability and aesthetic appeal:
- With Handle: 11.5 inches Height x 6.5 inches Width x 6.5 inches Depth.
- Without Handle: 6 inches Height.
These dimensions make the bucket substantial enough to hold a variety of treats, from candies and cookies to small toys or gift cards, while remaining manageable for children to carry. The depth of 6.5 inches provides ample volume, ensuring the bucket is not just decorative but genuinely functional.
Gathering Your Materials: The Supply List
Success in paper crafting relies heavily on preparation. Before you fire up your cutting machine, gather all the necessary supplies. Using high-quality materials ensures that the final product is durable and visually striking. The recommended supply list for this project is specific to achieve the vibrant, beach-ready look depicted in promotional images.
For the main structure of the bucket, you will need:
- Seafoam Cardstock: 3 sheets of 12x12 inch paper. This color typically forms the body of the pail, evoking the gentle hues of ocean waves.
- Cherry Cardstock: 1 sheet of 12x12 inch paper. Often used for accents or the rim of the bucket.
- Dandelion Cardstock: 1 sheet of 12x12 inch paper. This bright yellow adds a pop of sunshine to the design.
- Cascade Cardstock: 1 sheet of 12x12 inch paper. Useful for additional structural layers or decorative elements.
For the finer details and interior components:
- Caramel Cardstock: 1 sheet of 8.5x11 inch paper. This earthy tone is perfect for handles or base reinforcements.
- White Glitter Paper: 1 sheet of 8.5x11 inch paper. Adds a touch of elegance and mimics the sparkle of sea foam or sugar.
Beyond paper, you will need adhesive and embellishments to bring the bucket to life. Foam adhesive squares are essential for creating depth between layers, giving the bucket its 3D appearance. Glue is required for securing tabs and folds. For decoration, consider using ink to distress edges for a vintage look, rhinestones for bling, and brass brads (specifically 19/64” in diameter) to simulate the metal bands often found on real sand pails.
Note: All cardstock featured in standard tutorials is typically Encore Cardstock 80 lb cover (216 gsm). This weight is ideal because it is thick enough to hold its shape but thin enough to fold cleanly. You can explore similar options at a 12×12 Cardstock Shop. Please note that this is a paid link at no extra cost to you.
Step-by-Step Assembly Tutorial
Creating the Sand Pail Treat Bucket is a rewarding process that combines precision cutting with careful assembly. Here is a streamlined approach to building your bucket:
1. Cutting and Preparation
Load your chosen cardstock into your cutting machine according to the PDF Legend. Ensure your blade is sharp to achieve clean cuts, especially if using glitter paper, which can be tricky. Once cut, gently remove all pieces from the mat. Use bone folders to score any fold lines indicated in the SVG file. Crisp folds are the foundation of a neat 3D structure.
2. Constructing the Body
Begin by assembling the main cylinder of the bucket. Apply glue to the side tabs and connect them to form the circular shape. Use foam adhesive squares between the decorative layers (such as the seafoam and cascade layers) to create dimension. This layering technique is what gives the bucket its professional, store-bought look.
3. Adding the Base and Rim
Attach the bottom circle to the cylinder, ensuring it is centered. Reinforce this area with extra glue or tape, as it will bear the weight of the treats. Next, attach the rim pieces. If you are using brass brads, this is the time to punch holes and secure them, simulating the metal band of a traditional pail.
4. Attaching the Handle
The handle is both functional and decorative. Cut the handle pieces from the caramel or cherry cardstock. Layer them for strength if necessary. Attach the ends of the handle to the sides of the bucket using strong adhesive or brads. Ensure the handle is secure before adding any contents.
5. Final Embellishments
Add your personal touch with rhinestones, inked edges, or custom vinyl decals. This stage allows for maximum creativity. You might add a monogram for a wedding favor or a "Happy Birthday" tag for a party.
Practical Uses and Modern Relevance
The versatility of the Sand Pail Treat Bucket extends beyond simple summer crafts. In modern event planning, personalized favors are highly valued. These buckets can be adapted for various occasions:
- Weddings: Fill with lavender sachets or chocolates for a beach-themed wedding.
- Corporate Events: Use company colors and fill with branded merchandise for a unique client gift.
- Education: Teachers can use smaller versions as reward systems or classroom decorations.
- Retail: Small business owners can sell these as premium packaging for handmade soaps or candles.
By mastering this SVG project, you gain a skill set that is applicable to numerous other 3D paper crafts. The principles of layering, scoring, and structural integrity learned here can be transferred to boxes, lanterns, and complex architectural models.
In conclusion, the Sand Pail Treat Bucket SVG is more than a digital file; it is an invitation to create joy. With the right materials, a bit of patience, and this guide, you can produce stunning, functional art that captures the essence of summer. Whether you are a beginner looking for a manageable first project or an experienced crafter seeking efficient party solutions, this design offers a perfect blend of charm and practicality.