Witch’s Broom: Mastering the 3D Print for Halloween Magic
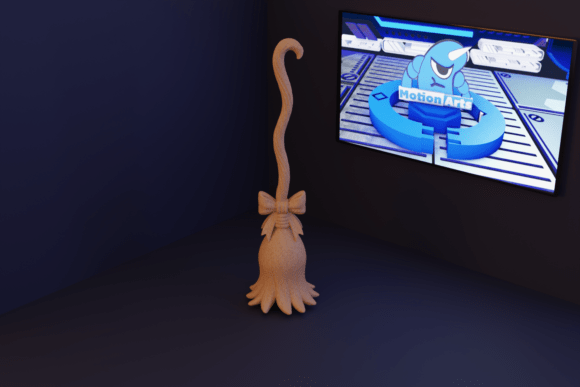
The allure of seasonal decor lies in its ability to transform ordinary spaces into immersive experiences. Among the most iconic symbols of autumn and Halloween is the Witch’s Broom. However, moving beyond flat, mass-produced plastic decorations to create something tangible and unique requires a shift in approach. This is where 3D printing enters the scene, offering creators, hobbyists, and small business owners the chance to produce high-quality, stylized props. The specific model we are discussing—a cartoon-style broom with a curved handle and detailed straw bundles—represents a perfect intersection of whimsical design and technical printability. Yet, achieving a clean finish that looks like a professional prop rather than a rough prototype involves avoiding several common pitfalls.
Understanding the Design Intent
Before slicing your file, it is crucial to understand what makes this particular Witch’s Broom model distinct. Unlike realistic replicas that demand intricate texturing and complex geometry, this cartoon-style iteration relies on bold shapes and balanced proportions. The curved handle is not just an aesthetic choice; it provides structural integrity and visual flow. The detailed straw bundles at the base are designed to be readable from a distance, making them ideal for dioramas or shelf displays.
Many beginners mistakenly assume that "cartoon style" implies "easy print." While the geometry is less complex than hyper-realistic models, the stylization demands precision. If the layers are too visible or the supports leave significant scarring, the charm of the cartoon aesthetic is lost. The goal is a smooth, playful look that invites interaction, whether as a standalone piece or part of a larger magical collection.
Common Mistakes in Material and Printer Selection
One of the most frequent errors occurs during the initial setup phase: choosing the wrong technology for the desired outcome. This STL file is compatible with both FDM (Fused Deposition Modeling) and resin printers, but they yield vastly different results.
- FDM Printers: Great for larger displays where durability is key. However, users often neglect nozzle size. Using a standard 0.4mm nozzle on fine details like individual straw strands can result in blobbing. A better approach is to use a 0.2mm or 0.25mm nozzle for the top layers or slow down the print speed significantly to allow for better cooling and detail retention.
- Resin Printers: Ideal for capturing the crisp edges of the cartoon style. The mistake here is under-curing or using low-resolution settings. For a Witch’s Broom intended for painting, surface smoothness is paramount. Skipping the washing and curing steps properly will lead to sticky residues that ruin paint adhesion later.
Ignoring these hardware nuances leads to prints that require excessive post-processing, wasting time and materials. Always match your printer’s capabilities to the model’s smallest feature size.
The Support Structure Trap
Perhaps the most critical aspect of printing this model is support generation. The prompt explicitly states that supports are required, yet many users rely on auto-generated supports without manual intervention. This is a costly mistake.
Auto-supports often place dense clusters in visible areas, such as the curve of the handle or the transition between the handle and the straw bundle. When removed, these leave behind pockmarks that are difficult to sand out without distorting the cartoonish curves. A more effective strategy involves manually placing supports only on non-visible undersides or using tree-like supports that touch the model at fewer points. For resin prints, ensure supports are thick enough to hold the weight of the straw bundle but angled to snap off cleanly.
Failing to optimize supports results in a piece that looks damaged straight off the build plate. Taking ten extra minutes to edit support placement can save hours of sanding and filling.
Post-Processing and Painting Pitfalls
Once printed, the temptation is to rush into painting. However, the "clean finish" promised by the design description is only achievable through diligent preparation. A common oversight is skipping the priming stage or using incompatible paints.
For FDM prints, layer lines are the enemy of the cartoon aesthetic. Simply painting over them highlights the imperfections. Instead, apply a filler primer, sand lightly, and repeat until the surface is uniform. For resin prints, ensure all support nubs are shaved flush and sanded smooth.
When it comes to color, avoid flat, single-tone applications. A cartoon witch’s broom benefits from subtle shading. Use a dry-brushing technique with a lighter brown on the straw tips to create depth and a worn, magical look. Neglecting this step results in a toy-like appearance rather than a curated collectible. Remember, the paint job is what brings the enchantment to life; the print is merely the canvas.
Evaluating Scale and Proportion
Another overlooked detail is scale. The STL file is dimensionless until you set it in your slicer. Printing the broom too small can make the detailed straw bundles merge into a solid mass, losing the intended texture. Printing it too large may expose structural weaknesses in the handle if the infill is too low.
Before committing to a full print, perform a test print of just the straw bundle section. This allows you to verify that the details resolve correctly at your chosen scale. Adjust the scale incrementally until the balance between detail visibility and structural soundness is achieved. This proactive check prevents wasted filament or resin on a full-sized print that fails to meet quality standards.
Making the Right Choice for Your Project
Whether you are creating decorations for a local event, building a portfolio piece, or adding to a personal collection, the Witch’s Broom offers versatility. However, success depends on respecting the technical requirements of the medium. By understanding the interplay between design intent, printer capabilities, support strategy, and finishing techniques, you avoid the frustration of subpar results.
Take the time to review your slicer settings, experiment with support placement, and invest effort in surface preparation. These steps transform a digital file into a tactile object of wonder. The magic isn’t just in the theme; it’s in the craftsmanship. With careful attention to these details, your printed broom will not only fly straight off the printer but also stand out as a high-quality addition to any Halloween display or fantasy diorama.